使用+部署GitHub+自定义域名
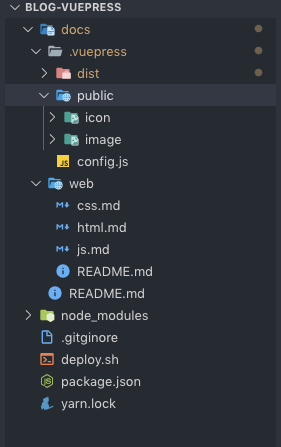
一、项目结构
二、搭建
- 全局安装 VuePress
npm install -g vuepress
- 新建文件夹
比如:blog-vuepress
- 项目初始化
// 命令行:  yarn init -y
// 文件: package.json

{
  "name": "blog-vuepress",
  "version": "1.0.0",
  "main": "index.js",
  "license": "MIT",
  "scripts": {
    "docs:dev": "vuepress dev docs",
    "docs:build": "vuepress build docs",
    "deploy": "bash deploy.sh"
  }
}
1
2
3
4
5
6
7
8
9
10
11
12
13
14
2
3
4
5
6
7
8
9
10
11
12
13
14
- 在 blog-vuepress 根目录下新建 docs
// 1.命令行: yarn docs:build
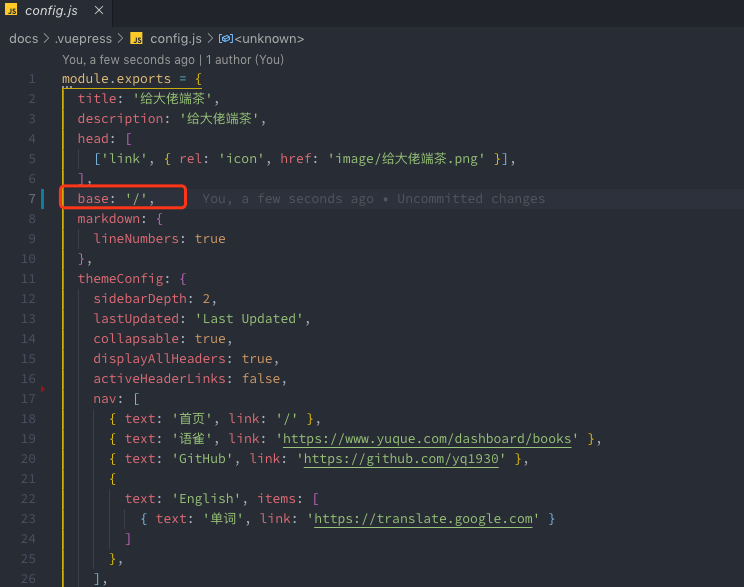
// 生成 docs/.vuepress 文件夹,在此文件夹下新建config.js
// config.js
module.exports = {
title: '给大佬端茶',
description: '给大佬端茶',
head: [
['link', { rel: 'icon', href: 'image/给大佬端茶.png' }],
],
base: '/blog/',
markdown: {
lineNumbers: true
},
themeConfig: {
sidebarDepth: 2,
lastUpdated: 'Last Updated',
collapsable: true,
displayAllHeaders: true,
activeHeaderLinks: false,
repo: 'https://github.com/yq1930/blog',
nav: [ //导航栏
{ text: '首页', link: '/' },
{ text: '语雀', link: 'https://www.yuque.com/dashboard/books' },
{ text: 'GitHub', link: 'https://github.com/yq1930' },
{
text: 'English', items: [
{ text: '单词', link: 'https://translate.google.com' }
]
},
],
sidebar: [ //侧边栏
{
title: '前端',
collapsable: false,
children: [
['/web/html', '超文本标记'],
['/web/css', '层叠样式表'],
['/web/js', '解释型编程语言']
]
}
]
}
};
// 2.在docs根文件夹下新建README.md
// README.md
---
home: true
lang: zh-CN
heroImage: image/给大佬端茶.png
actionText: 快速进入 →
actionLink: /web/html
features:
- title: GitHub
details: 全球最大的'同性交友网站'
- title: 语雀
details: 专业的云端知识库
- title: Vue
details: Vue是一套用于构建用户界面的渐进式框架。与其它大型框架不同的是,Vue 被设计为可以自底向上逐层应用。
footer: MIT Licensed | Copyright © 2019-present qun ye
---
1
2
3
4
5
6
7
8
9
10
11
12
13
14
15
16
17
18
19
20
21
22
23
24
25
26
27
28
29
30
31
32
33
34
35
36
37
38
39
40
41
42
43
44
45
46
47
48
49
50
51
52
53
54
55
56
57
58
59
60
61
62
63
64
65
66
2
3
4
5
6
7
8
9
10
11
12
13
14
15
16
17
18
19
20
21
22
23
24
25
26
27
28
29
30
31
32
33
34
35
36
37
38
39
40
41
42
43
44
45
46
47
48
49
50
51
52
53
54
55
56
57
58
59
60
61
62
63
64
65
66
- 运行 yarn docs:dev 查看本地效果
三、部署到 GitHub Pages
这里按照https://***.github.io/***方式部署
- 在 github 新建一个名为 blog 的仓库
- 按照 github 给出的步骤,讲 blog-vuepress 项目 push 上去
- 在 blog-vuepress 根目录下新建 deploy.sh 脚本
#!/usr/bin/env sh

# 确保脚本抛出遇到的错误
set -e

# 生成静态文件
yarn run docs:build

# 进入生成的文件夹
cd docs/.vuepress/dist

# 如果是发布到自定义域名
# echo 'www.yequn.fun' > CNAME

git init
git add -A
git commit -m 'deploy'

# 如果发布到 https://<USERNAME>.github.io
# git push -f git@github.com:yq1930/blog.github.io.git master

# 如果发布到 https://<USERNAME>.github.io/<REPO> (注意:我们用的是这个方式!!!)
git push -f git@github.com:yq1930/blog.git master:gh-pages

cd -
1
2
3
4
5
6
7
8
9
10
11
12
13
14
15
16
17
18
19
20
21
22
23
24
25
26
27
2
3
4
5
6
7
8
9
10
11
12
13
14
15
16
17
18
19
20
21
22
23
24
25
26
27
- 在终端上进入 blog-vuepress 项目中
命令行: yarn deploy

- 在 github 中仓库 blog 设置


在 github pages 的 source 下选择我们在脚本中 push 上来的分支,然后点击 https://yq1930.github.io/blog/ 看看是否部署成功
这里有个坑:
github 中的公钥是以前 windows 上,在 mac 上并没有更换,导致在 输入命令行: yarn deploy 时并没有产生 gh-pages breanch 分支,
导致找不到这个分支,解决的办法是:进入到 mac 上本地 .ssh 中 id_rsa.pub 中的公钥添加到 github 上即可
这样在 github pages 分支上找到这个 gh-pages breanch 分支
四、自定义域名
- 需要:一个域名(阿里云等)
- 解析域名,看下图

比如:我的域名 yequn.fun(阿里云购买的域名)
`文件 deploy.sh`

#!/usr/bin/env sh

# 确保脚本抛出遇到的错误
set -e

# 生成静态文件
yarn run docs:build

# 进入生成的文件夹
cd docs/.vuepress/dist

# 如果是发布到自定义域名
echo 'www.yequn.fun' > CNAME

git init
git add -A
git commit -m 'deploy'

# 如果发布到 https://<USERNAME>.github.io
# git push -f git@github.com:yq1930/blog.github.io.git master

# 如果发布到 https://<USERNAME>.github.io/<REPO>
git push -f git@github.com:yq1930/blog.git master:gh-pages

cd -
1
2
3
4
5
6
7
8
9
10
11
12
13
14
15
16
17
18
19
20
21
22
23
24
25
26
27
28
29
2
3
4
5
6
7
8
9
10
11
12
13
14
15
16
17
18
19
20
21
22
23
24
25
26
27
28
29
- config.js 中
base:'/',这里发现写法变成base:'/blog/',跳转 404 页面
- 命令行:
yarn deploy输入网址:www.yequn.fun 即可
PS: 在本地运行项目时,命令行: vuepress dev docs
← Axios VuePress插件 →